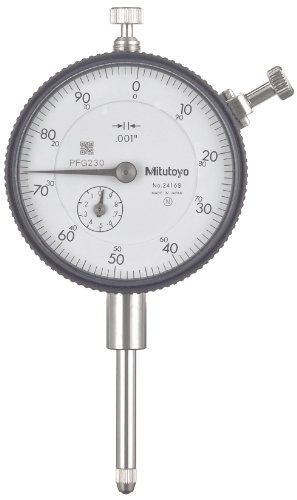
The Mitutoyo dial indicator has a black or white face, a choice of flat or lug, a 0.375" stem diameter, and inch measurements. The indicator has a 0.375" diameter stem, a #4-48 UNF contact point thread mount, and is used to measure surface variations in fractional inches. The choice of black or white dial and a contrasting hand help make measurements easy to read. The dial indicator comes with a choice of flat or lug back for a variety of mounting options. Flat back dial indicators are either clamp-mounted on the stem or plate-mounted on the rear of the indicator. Lug back dial indicators have a protrusion with a hole to mount the indicator using a lug or nut and bolt. Lug back dial test indicators usually come with the lug installed horizontally. The back on most indicators can be rotated to the vertical position. It has a stem design that provides a long clamping range, no through screw-holes on the frame for dust- and water resistance, and an involute curved lifting lever that provides smooth movement of spindle and dovetail joint for a tool-less connection. This dial indicator meets ANSI standards, Japanese Industrial Standard (JIS) B7503-1997, and American Gage Design (AGD) standards for face and thread size, and bezel and stem diameter.
Dial readings with three digits, such as 0-10-0, signify that the indicator has a balanced dial. Dial readings with two digits, such as 0-100, indicate that the dial has a continuous dial. Balanced dials are used to read the difference from a specific surface reference point. Continuous dials are used for direct readings and usually have a larger measurement range than balanced dials. Optional features include jeweled bearings for high sensitivity and accuracy, a revolution counter to measure overall change, waterproof, dustproof, shockproof, a white or black face, and reverse reading for depth or bore gage measurement.
Dial indicators are also called dial gauges, dial calipers, and probe indicators. These precision measuring tools are used to accurately measure small linear distances and object sizes. The dial magnifies the measurement so that it can more easily be read by the human eye. Frequently used in manufacturing, laboratories, and other industrial or mechanical fields, dial indicators are used anywhere a small measurement must be found and recorded or transferred, such as checking the variation in tolerance of a workpiece. Standard dial indicators measure the displacement along the axis of the indicator. Dial test indicators are very similar to dial indicators, except that the axis of measurement is perpendicular to the axis of the indicator. Dial and dial test indicators can be analog, with a mechanical dial, or electronic, with a digital display. Some electronic models transfer the data electronically to a computer for recording and potential manipulation.
Mitutoyo manufactures precision measuring tools, metrology equipment, and systems. The company was founded in Tokyo in 1934 and formed Mitutoyo America Corporation in 1963, which is headquartered in Aurora, IL.
What s in the Box?